The XLine Command and Creating Levels in your Drawing


With the Ortho Mode and Polar Tracking at your disposal, you may be tempted to completely ignore the concept of construction lines. But I certainly still use them, as they are actually really useful for specifying a logical concept in your drawing - for instance, a level.
Basic usage of the XLINE command is simple. Enter XLINE at the command line, followed by two points that define an origin and a direction. There are additional options at the command prompt - H and V constrain the construction line to the Horizontal and Vertical directions respectively. A forces the xline to be drawn at a specific angle, which can also sometimes be useful. The O option is basically the same as the offset command, but forces the new line to be an XLINE rather than imitating whatever you selected. The B option I've never actually used before, but this option draws the XLINE that bisects, or is the midpoint of the angle you enclose with three points.
I mentioned that XLINEs are useful for levels, but when drawing a section or elevation with known levels, it can sometimes be clumsy inputting the elevations. For this reason, I always draw sections and elevations at their real world level in the Y direction.

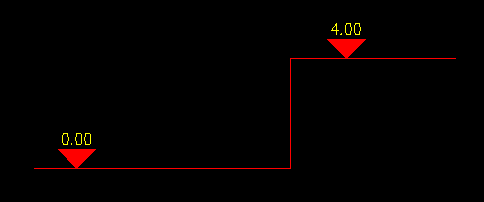
Here for example, we are showing a level of 0, and 4 above some datum. Here it would be good practice to ensure that the level we have shown on the drawing is actually the level in the Y axis of the drawing. That way, we can be more certain that the drawing is correct. It also makes checking very easy using the ID command, by simply looking at whatever it says for the Y axis, and comparing with what we know it should be.
But there still is the problem of inputting the levels in a quick and elegant way. Up until recently, I had been using an XLINE drawn horizontally at a level of 0, and then offsetting upwards the amount required. This works, but it's not the quickest way. A slight improvement is to invoke the XLINE command, press H for Horizontal, and then input a coordinate manually, using 0 (or any other number) for the X coordinate, and the desired level for the Y coordinate. This works, but still (for me) isn't as elegant as it could be.
So instead, I decided to create a neat little lisp, for getting an XLINE at a specific level on the drawing:
This simple command asks you for a level, and an XLINE appears in your drawing at that level. It also scales what you enter by a factor of 1000, so that levels displayed in metres are instantly converted to millimetres. I'd suggest having a look at the lisp code, as it is really quite a good example of how a little bit of lisp can get a job done. It also gives you the opportunity to optimise the code for whatever units you are using.
All for now,
Will
Comments
David Pugh
2013-01-22 16:57:41
Yes, I'm an x-line fan as well. I've created separate buttons for horizontal and vertical x-lines which keep repeating until you hit Enter. I've also added a lisp routine that remembers your current property settings, puts the x-lines on a certain layer, own colour and lineweight etc and then returns to the existing properties when you exit the command.
Will
2013-02-03 11:25:37
Nice! Ant chance you can share these lisp routines with us ?